Camera Calibration
Camera calibration determines the position and orientation of each camera in 3D space — known as the camera extrinsics. This is what allows the SDK to reconstruct real-world 3D movement from multiple 2D video feeds. It's required once per session setup — if you're measuring multiple subjects with the same camera placement, you only need to calibrate once.
Note: Camera positions must remain fixed after calibration. If you need to reposition cameras, you'll need to recalibrate.
Camera Setup
Getting camera placement right before calibrating is important — once calibrated, cameras cannot be moved.
- Use a minimum of 2 cameras, positioned to capture both sides of the subject
- Aim for 40–90° separation between cameras, symmetric around the direction the subject will be moving
- Ensure camera fields of view overlap sufficiently throughout the subject's full range of motion
- Keep cameras within 5m of the capture volume — closer is better
- Position cameras to minimize occlusion of body segments; every segment should be visible by at least 2 cameras at all times
For activity-specific camera placement recommendations, see the Activity-Specific Recommendations.
What You'll Need
A printed checkerboard pattern with known dimensions. Download our recommended checkerboard (PDF) — it's a 4×5 pattern with 35mm squares. If you use a different checkerboard, adjust the rows, columns, and square size accordingly.
Printing instructions:
- Print at 100% scale with no resizing or "Fit to Page" enabled
- The squares must be exactly 35mm wide — this is critical for accurate measurements
- Verify the square dimensions after printing
- Ensure there is a white border around all sides of the checkerboard
Mounting:
- Mount on a flat, rigid surface such as a plexiglass sheet
- Do not cover with any reflective material — avoid lamination
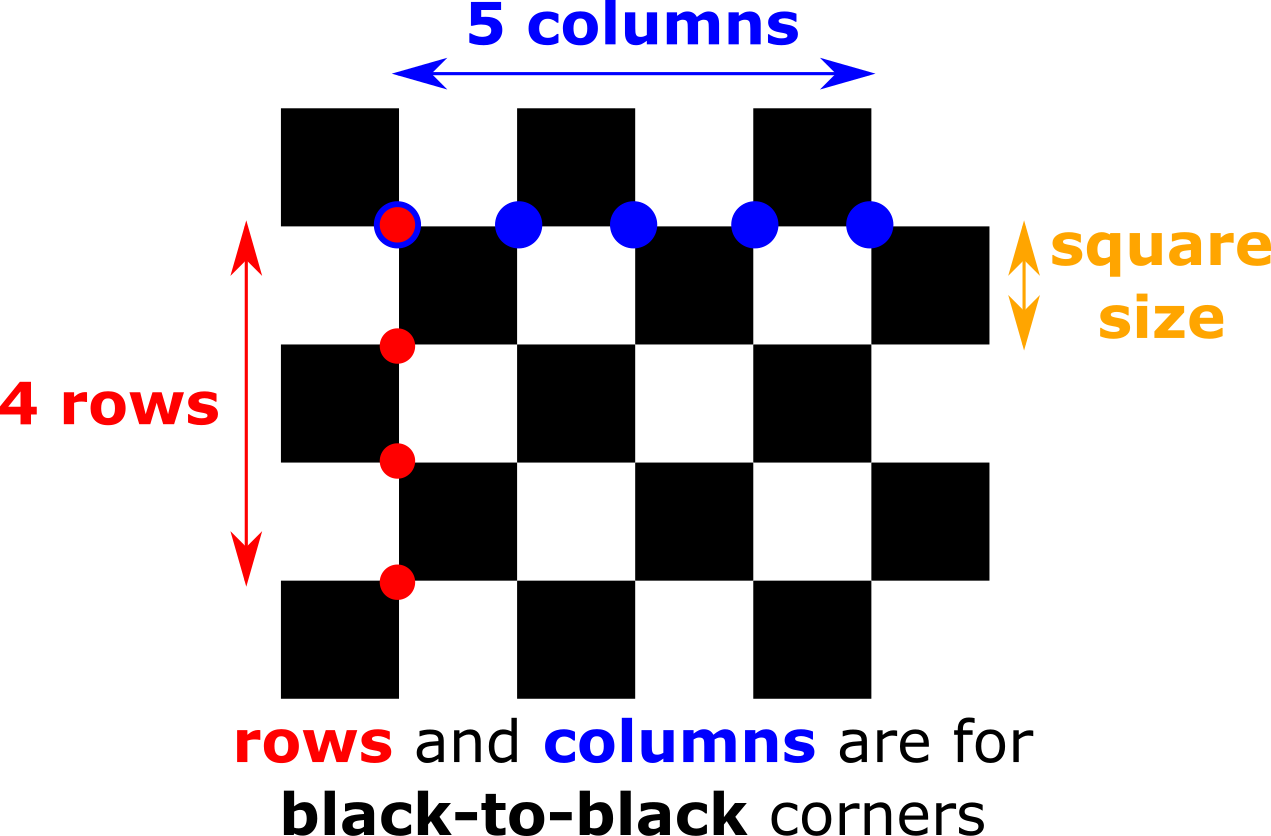
Understanding Rows and Columns
Rows and columns refer to the number of black-to-black corners, not the number of squares. For the recommended checkerboard and the example below, this is 4 rows and 5 columns.
Environment Setup
- Record in a well-lit environment with even lighting
- If recording outdoors with direct sunlight on the checkerboard, shade it before calibrating
- Position the checkerboard at the center of your intended capture volume
- Keep it within 2–5m from the cameras, and visible by all cameras
- Hold the checkerboard perpendicular to the ground with its long edge parallel to the ground
- Avoid pointing the checkerboard straight at any single camera — angle it slightly up, down, left, or right
Calibration
1. Create a Session
- Swift
- TypeScript
let session = try await service.createSession()
const session = await service.createSession();
2. Configure the Checkerboard
- Swift
- TypeScript
let details = CheckerboardDetails(
    rows: 4,
    columns: 5,
    squareSize: 35,  // millimeters
    placement: .perpendicular
)
const details = {
  rows: 4,
  columns: 5,
  squareSize: 35,   // millimeters
  placement: "perpendicular"
};
3. Run Calibration
- Swift
- TypeScript
try await service.calibrateCamera(session, checkerboardDetails: details) { status in
    switch status {
    case .recording:
        print("Recording calibration...")
    case .uploading(let uploaded, let total):
        print("Uploading \(uploaded)/\(total) videos")
    case .processing(let percent):
        if let percent = percent {
            print("Processing: \(percent)%")
        } else {
            print("Processing...")
        }
    case .done:
        print("Calibration complete!")
    }
}
await service.calibrateCamera(session, details, (status) => {
  switch (status.type) {
    case "recording":
      console.log("Recording calibration...");
      break;
    case "uploading":
      console.log(`Uploading ${status.uploaded}/${status.total} videos`);
      break;
    case "processing":
      if (status.percent !== undefined) {
        console.log(`Processing: ${status.percent}%`);
      } else {
        console.log("Processing...");
      }
      break;
    case "done":
      console.log("Calibration complete!");
      break;
  }
});
Troubleshooting
Checkerboard not detected:
- Verify rows and columns are set to black-to-black corners, not number of squares
- Make sure the checkerboard is fully visible by all cameras
- Check that it isn't pointing straight at any camera — adjust the angle
- Ensure lighting is adequate — neither too dark nor in direct sunlight
Poor calibration quality:
- Check the checkerboard is mounted flat and not warped
- Verify the printed square size is exactly 35mm
- Make sure the checkerboard is within 2–5m of the cameras
Next Steps
Once camera calibration is complete, proceed to Subject Calibration.